
반응형
Notice
Recent Posts
Recent Comments
| 일 | 월 | 화 | 수 | 목 | 금 | 토 |
|---|---|---|---|---|---|---|
| 1 | 2 | 3 | 4 | 5 | 6 | |
| 7 | 8 | 9 | 10 | 11 | 12 | 13 |
| 14 | 15 | 16 | 17 | 18 | 19 | 20 |
| 21 | 22 | 23 | 24 | 25 | 26 | 27 |
| 28 | 29 | 30 |
Tags
- JPA
- ChannelPipeline
- coalesce
- grafana
- docker-compose
- spring boot redis
- Airflow
- RabbitMQ
- docker compose mysql
- Netty
- Spring Open Feign
- KAFKA
- WebLogic
- Redis Sentinel
- argo cd
- Hibernate
- cassandra
- Docker Compose
- vue.js
- jmeter
- spring boot
- docker
- weblogic 10
- MySQL
- mybatis
- QueryDSL
- spring cloud
- Selenium
- netflix oss
- redis
Archives
- Today
- Total
IT.FARMER
gradle nexus 연동 본문
반응형
gradle nexus 연동
사전에 nexus 에 release 저장소와 snapshots 저장소를 만들어 둔 상태에서 gralde 에 nexus를 연동하기 위해 저장소 설정을 추가 한다.
- gradle v6 이하 (7이상은 ) 여기를 참조
- nexus 3.16 이상
////////////////////////////////////////////////////////////////////////////////////////////////
// 전체 프로젝트에 적용될 설정
////////////////////////////////////////////////////////////////////////////////////////////////
allprojects {


    def nexusUrl = 'http://${nexus_domain}:8081'
    def nexusId = 'userId'
    def nexusPassword = 'password'

    // 전체 프로젝트 에서 사용될 저장소 센터 센터
    repositories {
        mavenCentral()
        jcenter()

                // nexus download
        maven {
            credentials{
                username "${nexusId}"
                password "${nexusPassword}"
                url "http://${nexus_domain}:8081/repository/maven-public/"
            }
        }
    }


    // nexus upload
    uploadArchives {
        repositories {
            // version 명의 - SNAPSHOT 이 붙으면 snapshotRepository, -RELEASE 가 붙으면 releaseRepository 올라간다.
            mavenDeployer {
                repository(url: "${nexusUrl}/repository/mediareport-release/") {
                    authentication(userName: "${nexusId}", password: "${nexusPassword}")
                }
                snapshotRepository(url: "${nexusUrl}/repository/mediareport-snapshots/") {
                    authentication(userName: "${nexusId}", password: "${nexusPassword}")
                }
            }
        }
    }
}- repositories : 외부 라이브러리를 다운로드 받기위한 정보
- Nexus 를 사용하기위해서는 credentials 정보를 입력해준다.
- uploadArchives : 개발중인 내역을 Nexus로 업로드 하기 위한 정보 입력
- Nexus 에서 repository 를 생성한 정보를 입력 한다.
- 여기서 설정되는 Release 오 snapshot의 url 정보는 아래 생성하는 레파지토리의 이름에 따라 정의 된다.

- 아래 Nexus Repository 생성에서 repository 를 생성하고 난뒤 화면의 copy 를 눌러보면 해당 레파지토리의 url을 확인 할 수있다.
- 생성된 release와 snapshot 의 url 을 확인하고 gradle script 에 정의하면 된다.
gradle uploadArchives 명령어를 실행하면 nexus에 파일이 업로드 된다.
gradle clean **uploadArchives**업로드 할땐 snapshots 과 release 가 명확하게 나뉘어져 있다.
다운로드 시에도 Group을 만들어주고 해당 URL을 지정 하면 좀더 편리하다. 기본적으로 maven-public 그룹이 공개되어 있음으로 해당 그룹의 url을 사용한다.
Nexus Repository 생성
administrator login 환경설정 > repository > repositories maven2(host)
- create repository

- maven2(hosted) 선택

- release , snapshot 생성

- name : 사용할 레파지토리명
예시 ( mediareport-release) - version policy : 버전정책
예시 (release , snapshot)
Nexus Group 생성
administrator login 환경설정 > repository > repositories maven2(group)
- create repositoty

- maven2(group) 선택

- 유니크한 레파지토리 명칭 입력 >
mediareport-group

그룹에 필요한 member repositories 를 선택해 준다.
설정이 완료된뒤 목록에서 완성된 그룹 확인
레파지토리 목록 확인
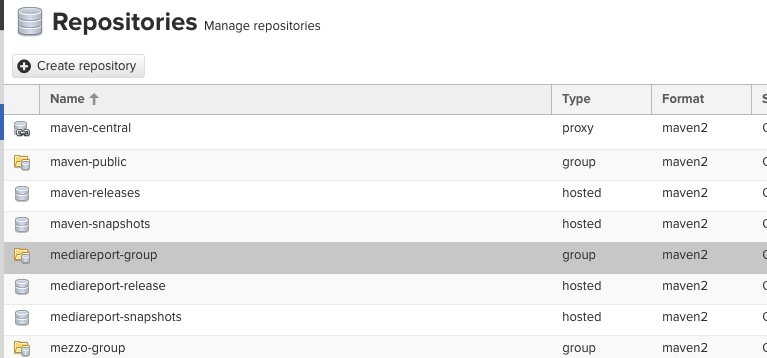
설정이 완료된 그룹을 목록에서 확인 할 수 있다.
상세 내역 정보

방금전에 생성한 그룹의 상세 정보를 확인 해본다. members로 설정한 mediarepost-snapshot , mediareport-release 가 속해 있는걸 볼 수있다.
반응형
'Auto Build(CI SCM GIT)' 카테고리의 다른 글
| gradle nexus repository upload, maven-publish 연동방법 (0) | 2023.05.25 |
|---|---|
| linux (centos) gradle 설치 (0) | 2020.07.28 |